
I needed more storage in the apartment, because I hate crowded, poorly organized closets. I like to see my clothes and regularly used stuff at once, and find it very frustrating to have stuff piled high. I also liked the idea of a raised bed, thinking that would create some separation between the “bedroom” and “living room” portions of my one room. The sliding doors are another hack-in-progress, more on them later…

So I doodled a bit (drawing’s not my strong suit, as evident above!) and came up with something that I liked. Originally I thought to incorporate some kind of a bookshelf to act as a rail so I wouldn’t fall from the bed, but pretty soon I realised this wasn’t going to be necessary. I haven’t fallen from my bed since I was 4 or something… It also looked nicer without the railing.
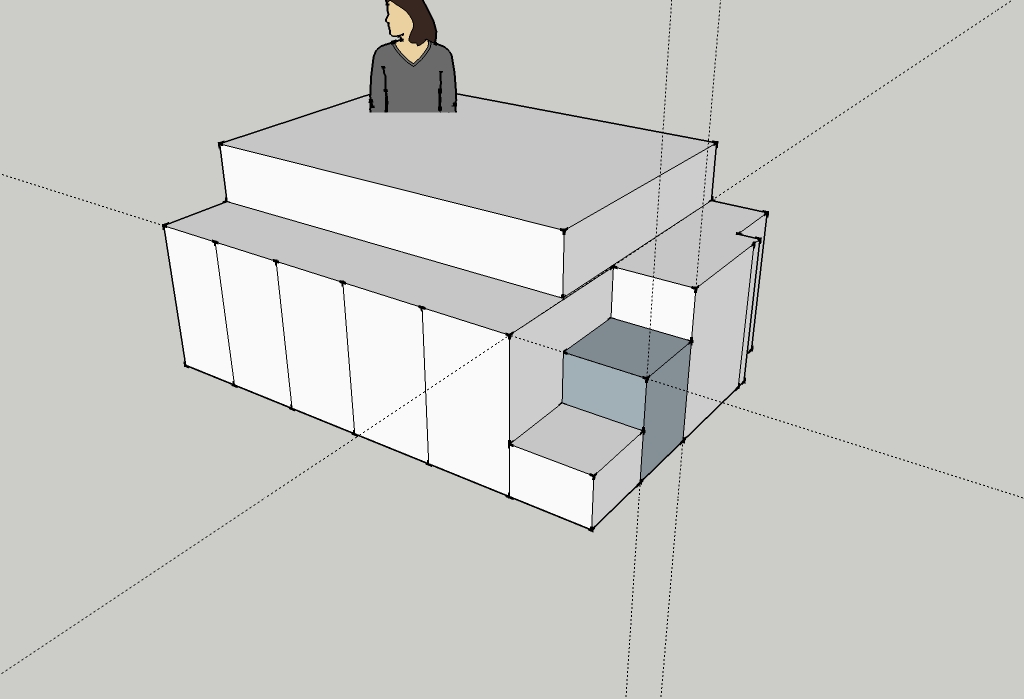
Then I sketched it up with the measurements I knew I would work with. I had already decided to build the base out of Ikea kitchen cabinets and doors. I’ve seen a lot of raised beds in Ikea Hackers and elsewhere in the net, and the cabinet versions seemed to end up looking the nicest. They also played together with my new kitchen, helping to make the small space coherent and calm.

Altogether there’s nine cabinets. Four 80 cm wide ones: 2 in the front and 2 in the back. There’s one 60 cm wide cabinet on the back, since the back wall is 230 cm and 60 cm was the widest that would fit. And then there’s four 40 cm wide cabinets: one in the front and three in the end.


All of the cabinets rest on a simple wooden footing on the floor, but nothing is attached to the floor or the walls. The weight of the unit with the bed on top is plenty enough to keep it in place. I put loads of big felt pads under the footing to keep it from scratching the floor, in case I want to sell the place later. I’m not sure those are necessary, but they’re there now… I even remembered to paint the lumber footing before laying it on the floor, so I didn’t have to paint it in the spot!
The cabinets are attached to the footing and to the adjacent ones. Then I built the inner structure, adding lumber to hold most of the weight of the bed and to rigidify the part with no cabinets. The big pieces of lumber are on 2 corners of the bed and the cabinets and smaller lumber hold the back side of the bed. I also added 15 mm plywood on top of the cabinets to give them a nice finish and to keep with the theme of the kitchen (and to make the top level, where they’re not visible). Only the parts that are visible form under the mattress are treated – yes, I’m lazy. 🙂

My bed is a box spring -type bed (the kinda mattress with a built-in wooden frame, they don’t seem to sell the exact same type at least in the States) from Ikea and I attached it to the cabinets and the plywood with L-brackets. That way I didn’t need to build a “roof” to my storage space: the mattress forms the roof. I just made sure to measure the base so that the mattress covers the opening!
A quick search didn’t come up with a tutorial on how to shorten the cabinets for the steps, so I’m thinking of doing one. But since I didn’t take pics the first time I did these, it might be a while…
Basically, I just sawed the sides of one 40 cm wide cabinet into two and drilled new holes to correspond to the required bits to assemble the cabinets. To someone with a bit of DIY experience it was pretty straightforward and easily figurable just by looking at the parts and how they were supposed to fit together. Of course I needed 2 cabinets for the hack (to have enough top and bottom parts), but I didn’t need to use the sides of the other cabinet. I also got around with just 1 door for these shorter ones!
I left the 80 cm wide middle cabinet open (no backing!) to form a doorway into my storage space. To keep it looking uniform I only used the 40 cm wide doors. Most of the plywood is attached with screws from underneath, but the smallest step was so low that it was easier to glue the cover piece on it. Oh, and then I put some thick cardboard covered with DC Fix (a semi-permanent plastic film/tape) over the end piece on top of the steps, to cover the hole there and make it look nice. That’s just attached with double sided tape and seems to be holding up fine.

And I even have a light under there, to make it easier to rummage for what I need… I think it turned out pretty nifty, and it’s definitely great to have so much storage! It makes me happy just looking at it – there’s nothing quite like the feeling of a job well done!
Let me know if you find this helpful and please share if you build something similar! I’d love to see your interpretation of the storage bed! 🙂


That’s amazing!! good job
Thanks! 🙂
Question: Do you still enjoy the bed? We want to make something similar. Thanks!
Yeah, definitely! The bed is just the same as any bed, only a step or two to climb, and I love that I have so much space for my stuff now! 🙂
Looks amazing 🙂
Thanks! It turned out better than I expected 😉
nicely done! great inspiration!
Thanks! I’ve gotten so much inspiration from Ikea Hackers, it feels great to be able to share something too! 🙂
I just found this thru Ikea Hackers site and came over for more pics. Very creative and a great use of space!! We’re downsizing and this would be perfect for our new place. Thanks so much! 🙂
Thank you! I’m sure yours will be perfect! 🙂
Great job!
Thanks! 😀
Great Idea! Ikea has 2 heights for those cabinets I think. 70 and 92 cm. Which one did you use?
Thank you! I used the 70 cm height, so the total height is about 76 cm (the footing and the plywood cover included). That’s easy enough to climb, so I don’t have to use the steps all the time! 🙂
Thanks for reply 🙂
I’m thinking of doing something similiar but currently I have 160 cm matress. I just can’t decide whether to use higher cabinets 🙂
The 75 cm is a bit low to crawl into, so I guess 90 cm would offer a more comfortable storage. I mostly store there stuff I don’t need that often, like seasonal sporting goods, decorations, craft supplies and tools, so it hasn’t bothered me much. 🙂
90 cm it is. Oh, one more question, I like those door handles. Did you get them in Ikea or somewhere else?
They’re Ikea “Blankett” 🙂
Oh great! Thanks 🙂
No problem! 🙂
Just finished first part of my storage bed inspired by your 🙂
Still to do: Stairs and doors
Awesome! Please share a pic or two when you’re done! 🙂
I will 🙂
Oh, how do I attach photos here ?
I’m not sure if you can add them directly to the comment, but you can upload them to flickr (http://www.flickr.com/) or tinypic (http://tinypic.com/) or other image sharing sites and add the link here 🙂
Your platform bed is nothing short of inspiring. I came over by way of the Ikea Hacker site and immediately had to read / look at everything. Your little house is AMAZING! The kitchen is spectacular – a beautiful example of form following function. I can’t wait to see the rest of the house. WOW! I may have to do some sort of platform bed in my house. Thank you for the inspiration.
Thank you so much for the encouragement! 🙂
Pingback: Säng med förvaring runt och under | DIY or DIE
Great job! Thanks for the inspiration for a platform/raised bed. I am going to be downsizing to a studio and was trying to figure out ways to designate “spaces” within the area and this will be a great way to accomplish that!
Thanks! That was my inspiration as well… I’m sure it’ll work out great for you, too! 🙂
fabulous !
I did a kind of bed with Faktum too for my daughter, but yours…it’s amazing ! with light under 😉 my kids would love it ❤
Hahaha yeah, my lil’ sis wanted to move under there… 😀
I love, love, love this. I am thinking of doing something like this in my small apartment. Great inspiration.
I’m also going to show this to my boss (I work in the kitchen department in ikea in denmark) – He’s going to love it. 🙂
Is it correct to assume the cabinets are wall cabinets and 37 cm deep?
And how did you form the ending of the bed, by the stairs? Is it ply wood that you painted or did you buy a side in the whole lenght in IKEA or how did you do it? I can’t quite figure out how you got that good a finish on it.
Thanks Pernille, I love to hear you like it!! 🙂 Yeah, the cabinets are Faktum top cabinets. They’re 70 cm high, and I think 37 cm deep sounds about right. You can probably get the Faktum cabinets at a discount now, too, with the new Metod system coming around! 😀
I used a plastic film called DC Fix (http://www.d-c-fix.com/). The white shade was happily an almost exact match to the Applåd doors. I just covered a piece of cardboard with it and stuck it there with double sided tape… I was originally thinking to use a thin plywood and paint that, but I had the cardboard and DC Fix on hand and tried them out and it seems to hold up really nice. 🙂
This is absolutely fabulous! I’ve wanted to make a bed like that for myself for ages…but it doesn’t quite work when my bedroom is only 180cm high at the highest point 😉
Very nice work. I envy you that spot. Going to save this post for later (when I have a bigger house…sometime in the future 😉
Thank you! My ceiling is only 247 cm, so it’s not very high either, but admittedly 180 cm would be a challenge! 🙂
That´s a really nice IKEA hack!
Thanks 🙂
Awesome design! How difficult is is to get into that space underneath the bed? I might be missing something because even with the backs of the cabinets left unassembled I feel like it would be challenging to get in that space and make full use of it.
Thanks! I don’t think it’s very difficult, but then again, I have no problem crawling a bit. Any mobility issues might make it difficult, I guess. I get inside on my hands and knees, but once there I can sit upright.
I don’t store anything very heavy there. Most of my stuff is in plastic boxes that are pretty easy to lift even when sitting… like extra dishes, childhood toys and other stuff I want to keep but rarely look at, out-of-season sports equipment, craft supplies and tools. When I need them I mostly take the whole box out and put it back in only when I’m done with the stuff. And I only left the back out of one 80×70 cabinet, since I think the back gives the cabinets sideways stability.
Pingback: Ikea hacking | Rated People BlogRated People Blog
Pingback: IKEA hacking | Rated People
OMG it’s so pretty and well done! I wish I had your talent or knew someone who could make such an amazing job like you did. May I ask wether you are male or female? 🙂 I got to your blog via another link.
Hahaha, thanks! I’m female, but my folks let me play with a hammer and nails just the same as a needle and thread 🙂
I think you are a genius …
🙂
Is that google sketch up you used for planning? I love the design and will definitely plan on making it, although I can’t find the Faktum cabinets you mentioned on Ikea site, and I doubt it’d fit quite as nicely in my setup so I’ll have to make some changes to it.
It’s G SketchUp alright! Ikea changed the Faktum kitchen range to Metod a while ago and I haven’t taken a look to know what’s changed, but doubtless the sizes will be about the same. Let me know how it goes for you, I’d love to see your interpretation! 🙂
Great work! Congrats!
One question, does it creak when you climb it or when you move around in your bed?
It doesn’t creak, and if it would, that would be a sign that it would need more supports or better attachments. The only noise is if I jump on the bed, then the doors open and close. I put felt pads to quiet that and they work nicely. When you jump on the bed it bends down a bit and the air pressure inside the storage space increases slightly, and that opens the doors just a bit. 🙂
I really like this!!
Can you attach the links to IKEA so I can see what to buy :)?
Sadly I can’t, since Ikea quit the Faktum kitchen cabinets. The new kitchen cabinet range is Metod. I started by figuring out the space I had and then fiddling with the options so I found a combination of cabinets that worked. 🙂 I only used top cabinets, since those are 37 cm deep. The bottom cabinets are 60 cm deep, and that would have been too much for me. With a wider bed they could have worked nicely, too! 🙂
I love this and thought that a similar style would also work in my caravan where storage is vital. Although the ceiling height is only 200cms it could work, especially in a child’s room.
Thanks! Yeah I think it would work nicely for a child’s room also with the 200 cm ceiling! 🙂
How did you make the diagram with the measurements? Like what program did you use?
Hey Cris, I used SketchUp http://www.sketchup.com/ 🙂
Hi!
Can you jump on the bed? I have young kids at home…. They tend to jump..
my current bed broke under all that jumping 😦
Hi, I don’t really jump on it, so I don’t know how much jumping it can withstand. 🙂 It’s sturdy, but the bed part is just a regular Ikea box spring. If your kids have managed to break something like that, I guess they might be able to break this as well…
Pingback: Des DIY sympas et faciles | Trendy Mood
Hi,
Love this bed and really keen to make it. The only part I can’t quite work out is the surface your mattress is sitting on – I can see from the photo that there are wooden slats, but how far do they overlap on top of the front cabinets? Is there any way of getting sort of a photo or diagram of maybe a birds eye view without the mattress, or a photo from underneath but facing in the other direction of the photo you have above? Sorry if I’m not making sense!
Thanks
Hi, the wooden slats that you see in the pic I’ve taken from under the bed are actually part of the bed! In the Nordic countries (I’m in Finland, but my boyfriend in Norway has the same type of a bed) you can buy these mattresses straight from Ikea or anywhere really, they’re really popular since you just add legs and got a simple bed with clean lines. I’ll add a link to the Finnish Ikea so you can see how the mattress I have looks: http://www.ikea.com/fi/fi/catalog/products/60152496/#/70156757. The outer frame is solid and I just attached that to the base structure with little metal brackets.
Now, I checked the UK and US sites and they don’t seem to sell the same product. I guess the bed culture is different or something… The closest I can find is this in the UK: http://www.ikea.com/gb/en/catalog/products/40158772/ and this in the US: http://www.ikea.com/us/en/catalog/products/90158821/. To me that looks like it’s just half the bed I have – the base part. The soft sleeping part seems to be missing, so you need an actual soft mattress on top of that frame. In mine, it’s all in one, but most people like to add a mattress pad (also sold in the UK and US, although not the thicker, good foam ones), and the function is the sheets are wrapped under that so they stay in place easier. The pad also protects the actual mattress and it’s cheaper to replace when needed.
So I guess you either need to add some slats (ikea sells these in the UK: http://www.ikea.com/gb/en/catalog/categories/departments/bedroom/24827/ and these in the US: http://www.ikea.com/us/en/catalog/categories/departments/bedroom/24827/) or get one of those mattress bases plus any mattress, if you live in a country where you don’t get them in one piece.
Hope this clears it up! Do ask if I left something unexplained! 🙂
I wasn’t expecting such a massive reply, thankyou for all that work! I’ve just had a look on the Australian site and we don’t have box spring mattresses here either – I have slats underneath my current bed sort of like this http://www.ikea.com/au/en/catalog/products/29422207/
Would something like that be okay, or should I buy myself a full mattress base? And I was trying to work out what the closer side of the mattress is resting on. Does the timber on top of the cabinets go all the way underneath? Or is it just a gap underneath the mattress base? Sorry for all the questions! Thanks for the help, I am so excited to get started.
No problem, I got interested in seeing how different the options are in different regions – I sort of thought Ikea is Ikea is Ikea everywhere you go, but their selection is obviously modified to the region! 🙂
The front side of the mattress rests on a timber base under the plywood. I wanted the visible ledge by the bed to be about 40 cm deep. The cabinets are only 37 cm deep, so I needed something to support the inner edge of the plywood. I put the thick vertical wood pieces in the corners inside the space (they align with the front corners of the bed pretty nicely), and rested a wood beam on top of those, and then the plywood sits on top of that, and the bed over the plywood. The bed doesn’t really rest on top of the front cabinets at all, I suppose, as the corner beams bear most of the load.
If you were to use the slats, I supposed you could build a frame for them and rest it on the cabinets in the back and beams in the front. Or maybe get a cheap bed frame and mount that on the cabinet base? A Fjellse with the legs sawn off, maybe, that would save you the trouble of building the base yourself!
I’m sure yours will turn out just great! 🙂
Thankyou that’s fantastic, really helpful 🙂 Ok that makes sense now. University has just started back so it will probably take me a while to plan it out and get around to building it, but I will let you know how I go! Thanks so much for all the help, and for designing it in the first place! Perfect for my small bedroom.
Thanks! Would be super to see how yours turns out, yeah! 😀
Thank you for spending your time to share your knowledge. not only do I find your finished room amazing ( i love the colors and the wall… everything!) but also it helped me decide how to add storage space to my room! Thank you.!
Thanks Colleen! It’s really nice to hear it’s useful to people! 🙂
Hi there,
i work for IKEA in Paris france and we still sell Faktum.
i absolutely love your project and i ll do mine using your as a model but with a 160X200 mattress so i need to see how to fix it.
i ll use flooring wood on the top of the cabinet.
i ll try to take picture to show you.
thanks a lot for your beautiful work in your house.
Arnaud
Thank you Arnaud! I’m sure 160 wide will work just fine. Please do share your result! 🙂
I did mine with 160×200. I still owe photos of how I did it.
Finally. Here’s my version http://hipnos.net/?p=52
I love the drawer idea on the stairs! Great job! 🙂
looks great too! thanks for sharing!!!
Great hack! Next step would be to replace the storage space by a sliding bed or sofa?
Thanks! I needed storage more than an extra bed, but in another situation that might be a good idea! 🙂
this is incredible! i really want to do something like this to maximise space in my room and this has given me a lot of inspiration 🙂 thanks
Great to hear you like it! Thanks! 🙂
Hi would you be able to send me links to the cabinets I cant find any like that
I’m sorry, micky, but Ikea discontinued the Faktum series which I used. They have a new cabinet range now, but the sizes are different. Still, I think they can be used similarly, just measure the space and calculate how many you can fit and how wide you want your bed to be! 🙂
What are the measurements of the whole thing overall? I’m thinking of doing something like this.
Hi Adeline! The bed is 120×200 cm, and the back wall is 230 cm. The front of the platform is 240 cm (it wraps around the small wall at the end) and it’s 160 cm wide so the ledge by the bed is 40 cm wide. The height is about 75 cm. Hope this helps! 🙂
Roughly how much was this to make? Thankyou 🙂
I bought the 8 cabinets, 7 doors and 8 handles from Ikea, and I think they cost around 250 euros. Pretty much everything else I already had, since I was renovating the kitchen at the same time, but I’ll round it up to an even 300 just to be on the safe side. On top of that was the bed, I bought a new one since I didn’t have one before. 🙂
What a great idea, my daughter and me love it. As we move in our new apartment this summer my daughter would like to have a bed like yours in her room. I’m planning with sweet home 3d right now and it would be great if I could have your sketch up model, but I can’t find it on trimble gallery. Would you be so kind sending your sketch up or upload it to trimble? Thanks a lot.
Thanks Andrea! 🙂 I’ll see if I manage to navigate myself around trimble, I’ve never used it before…
I love this idea and we are building out our garage for more storage and to make a guest room out of it since our place is small. I re read your post on how you did it, but I don’t quite understand what Ikea modules you used as the stairs– I read that the kind of product you used is discontinued, but would you still let me know what kind of product it was- drawer? Box? I want to recreate the beautiful work you did 🙂 Thank you so much for sharing!
Hi Michelle, the units on the stairs are the same kitchen cabinets that I used on the rest of the platform! I sawed the sides to the correct height, so they form the steps. I think the current range (Metod) has some smaller cabinet units, maybe you could use those as they are? Hope this helps! 🙂
Wow, this is amazing! I’m looking for something like this.. Or, exactly like this. Can’t you come to Sweden and build this to me? 😉 haha.
This is going to be my future project! (I haven’t build anything in my life)
Thanks Sofia! 😀 I’m sure you’ll do great!
This is beautiful. I’ve read through all the comments and learned even more. You are such a thorough replier, it’s refreshing!
I do have a question re: the “stairs.” So, if I have this right, they are originally all the same length, you just sawed off the ends to make the ascending steps. Is that correct?
You don’t by any chance have photos of that part, do you?
Thanks Andrea! 🙂 Unfortunately I forgot to take photos when I did the steps, but the cabinets are relatively easy to shorten.
The tallest step is just the normal unmodified Faktum cabinet, and the two shorter ones are modified. Before I assembled the shorter ones, I sawed the side pieces to how high I wanted the step to be. Then I measured and drilled new holes for the screws and whatnot on the new lower edge (because I sawed the old ones off with the shortening) and assembled the cabinet following the instruction booklet, only now the side pieces were a bit shorter. The back piece and doors need to be shortened too. I didn’t bother to finish the raw bottom edges of the doors in any way, because they’re not really visible in normal use and I’m lazy like that… 🙂
This is awesome! What s the name of the “stairs” furniture? I will need to build this
Hi Tigris! Thanks! The stairs are the same cabinets, “Faktum” (now discontinued at Ikea), but I shortened them (some tips at the previous comments) 🙂
What are all the parts (cabinets, and cabinet doors) called and how do you make the steps leading up?
never mind, for that above, but where did you get the wood that you put on the top of the loft and on the steps?
Hi Jasper! I got them from Puukeskus, which is a Finnish lumber store chain, but I bet you can get birch plywood (the top of the platform is 15 mm thick) and construction lumber from any old Bauhaus or Lowe’s or any other lumber store around you. I did a post on how to treat the plywood here http://wp.me/p3q5ec-12. Hope this helps! 🙂
How do you get to the area under your bed?
I left the backing off of the middle wide cabinet in front 🙂
Nice, how did you cover the gap next to the makeshift steps? You probably answered this before, so my apologies….
I used a piece of cardboard that I covered with DC Fix, a type of self-adhesive decorative film. They happened to have the exact shade of white of the Ikea Applåd doors I used 🙂
Also what was this: https://ohyesblog.files.wordpress.com/2013/05/img_8993.jpg?w=869 for? was it to keep the flooring from slipping or was it for the wooden box spring?
Those brackets attach the box spring to the platform! 🙂
This is FANTASTIC!! Love it! I wanna hack your hack!
Can the bed hold the weight of 2 adults though?
Thanks, and yeah, it can hold 2 people easily 😀
I can confirm that too. There is no problem at all 🙂
Pingback: build a platform bed with storage underneath | Woodworking Projects
did you just shorten cabinets for the steps or what did you do? looks great!
Yeah, that’s right! 🙂
Pingback: build platform bed with storage underneath | Woodworking Projects
I love it…!!! thinking of trying to make somethig similar, I’m just not that handy 🙂 🙂
How long did it take you to built it??
A couple of days altogether, I think, but I was lazy and took my sweet time doing it! It would be half a day if you have all the materials and tools ready. 🙂 If you can put together the Ikea cabinets, I’m sure you have what it takes to build a bed like this!